• TikTok
  • Instagram
  • Twitter
  • Facebook
  • YouTube
  • Star Wars Kids
Star Wars Logo

Search

My Account Logout
  • More More
    • NEWS + FEATURES
      • THE LATEST
      • ANDOR
      • CELEBRATION
      • QUIZZES + POLLS
      • BOOKS + COMICS
    • VIDEO
      • ALL VIDEO
      • THIS WEEK! IN STAR WARS
    • FILMS
    • SERIES
      • All Series
      • Andor
      • Skeleton Crew
      • Ahsoka
      • The Mandalorian
    • GAMES + INTERACTIVE
      • View All
      • Star Wars Outlaws
      • Games + Apps
      • VR + Immersive
    • DATABANK
      • ALL DATABANK
      • ERAS
    • DISNEY+
      • STREAM NOW
      • EXPLORE
      • THE DISNEY BUNDLE
Local Nav | Drop-Down Phase III - 20231020
My Account Logout
  • other
  • instagram
  • twitter
  • facebook
  • youtube
  • other
STAR WARS | DISNEY+ STAR WARS ON DISNEY+

All

  • Andor
  • Star Wars Celebration
  • Skeleton Crew
  • The Mandalorian
  • Ahsoka
  • The Acolyte
  • Obi-Wan Kenobi
  • The Book of Boba Fett
  • The Bad Batch
  • The Clone Wars
  • Visions
  • Behind the Scenes
  • Books + Comics
  • Characters + Histories
  • Collecting
  • Creativity
  • Disney Parks
  • Disney+
  • Events
  • Fans + Community
  • Films
  • Games + Apps
  • ILM
  • Interviews
  • LEGO Star Wars
  • Lucasfilm
  • Merchandise
  • Opinions
  • Quizzes + Polls
  • Recipes
  • Rogue One
  • Solo
  • Star Wars Day
  • Star Wars Rebels
  • Series
  • The High Republic
Creativity
Scavenge the Junk Drawer for This Festive Datapad Décor

Scavenge the Junk Drawer for This Festive Datapad Décor

Upcycle and download the schematics for this one-of-a-kind ornament.

Kelly Knox
Kelly Knox
December 14, 2023

Upcycle and download the schematics for this one-of-a-kind ornament.

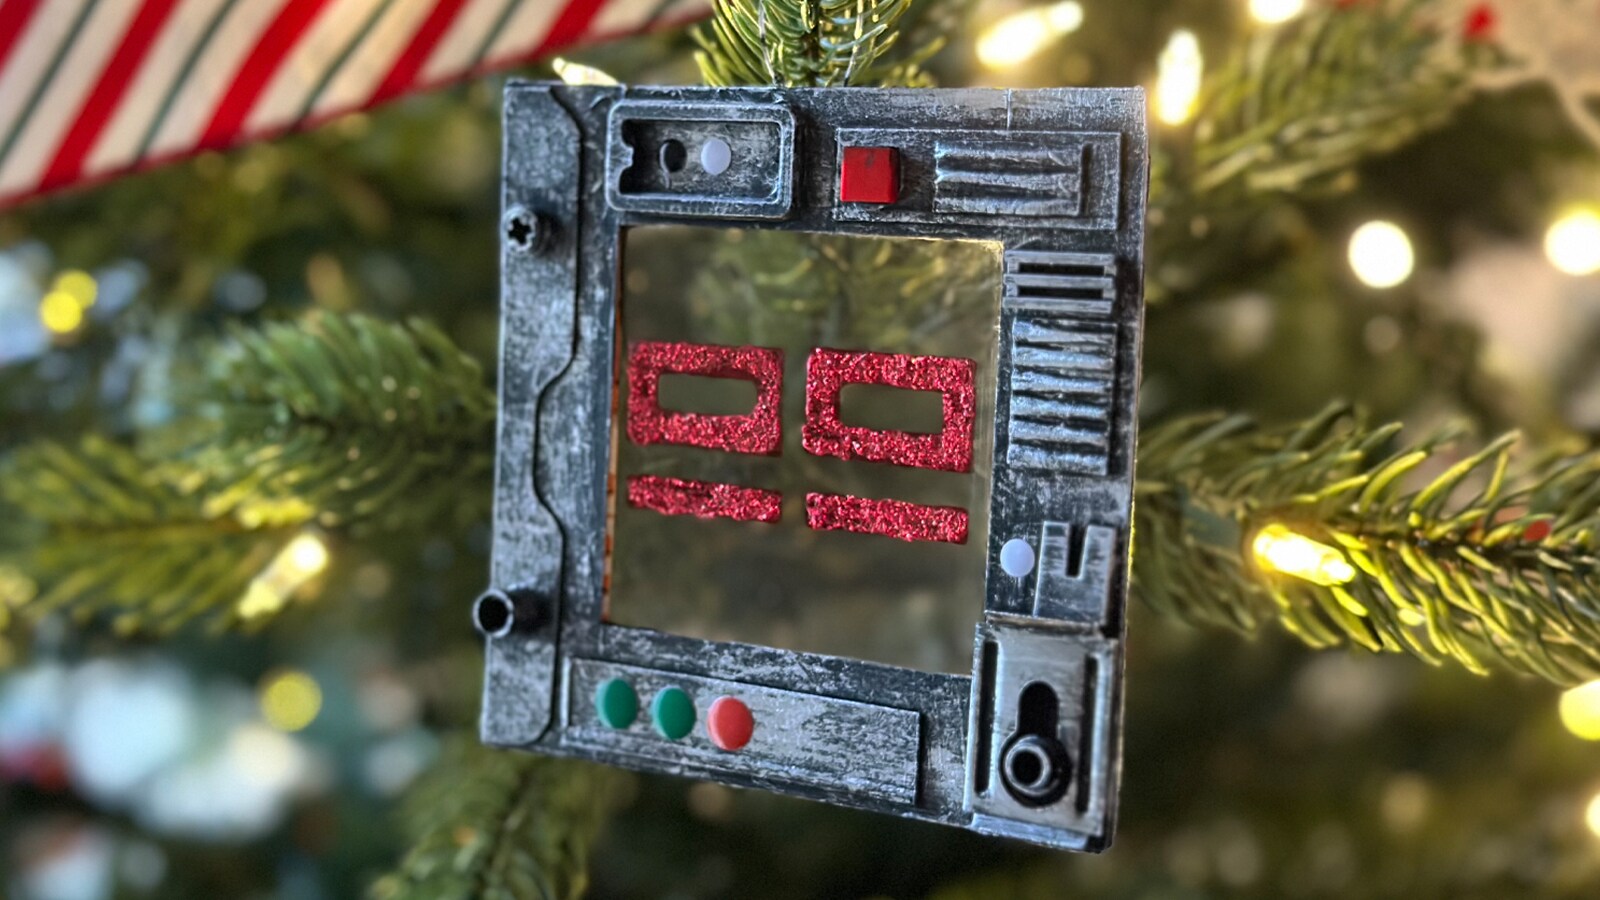
Give your holiday decorations some Star Wars flair with a DIY datapad ornament! Choose your favorite galactic symbol from the provided template, and then get ready to greeblie. Complete with pieces you’ll rescue from the recycling or discover in the depths of your junk drawer, your datapad décor won’t look like any other ornament out there.

Follow these schematics to make your very own datapad!

What You’ll Need

  • Clear plastic packaging

  • Scissors

  • Masking tape

  • Printed datapad symbol template

  • Red permanent marker

  • Red glitter and school glue or red glitter glue

  • Large piece of food or toy packaging cardboard

  • Hot glue gun or school glue

  • Fishing line or string

  • Clothespin (optional)

  • Bits of plastic packaging, leftover hardware pieces, extra small LEGO pieces, etc.

  • Black acrylic paint

  • Paint brushes

  • Silver acrylic paint

  • Enamel dot stickers

Get Started!

The activities in this article should only be done with adult supervision.

Step 1: Cut a piece of clear plastic packaging approximately 4 inches by 4 inches in size.

Choose the symbol you’d like to show in the datapad “screen” from the printed template.

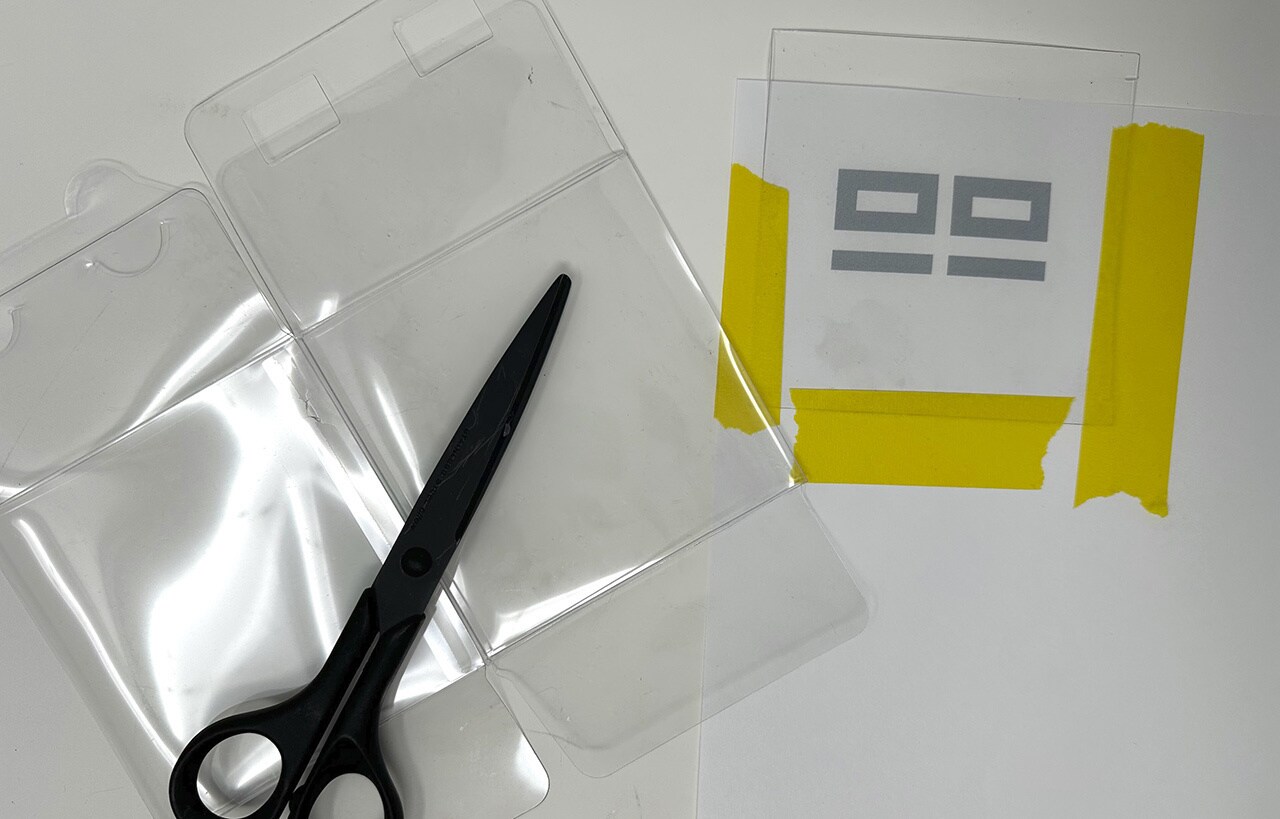
Step 2: Choose the symbol you’d like to show in the datapad “screen” from the printed template.

Step 3: Center the clear plastic square you cut over the symbol, and use the masking tape to tape it in place.

Trace the symbol with red permanent marker. Let the ink dry and remove the masking tape.

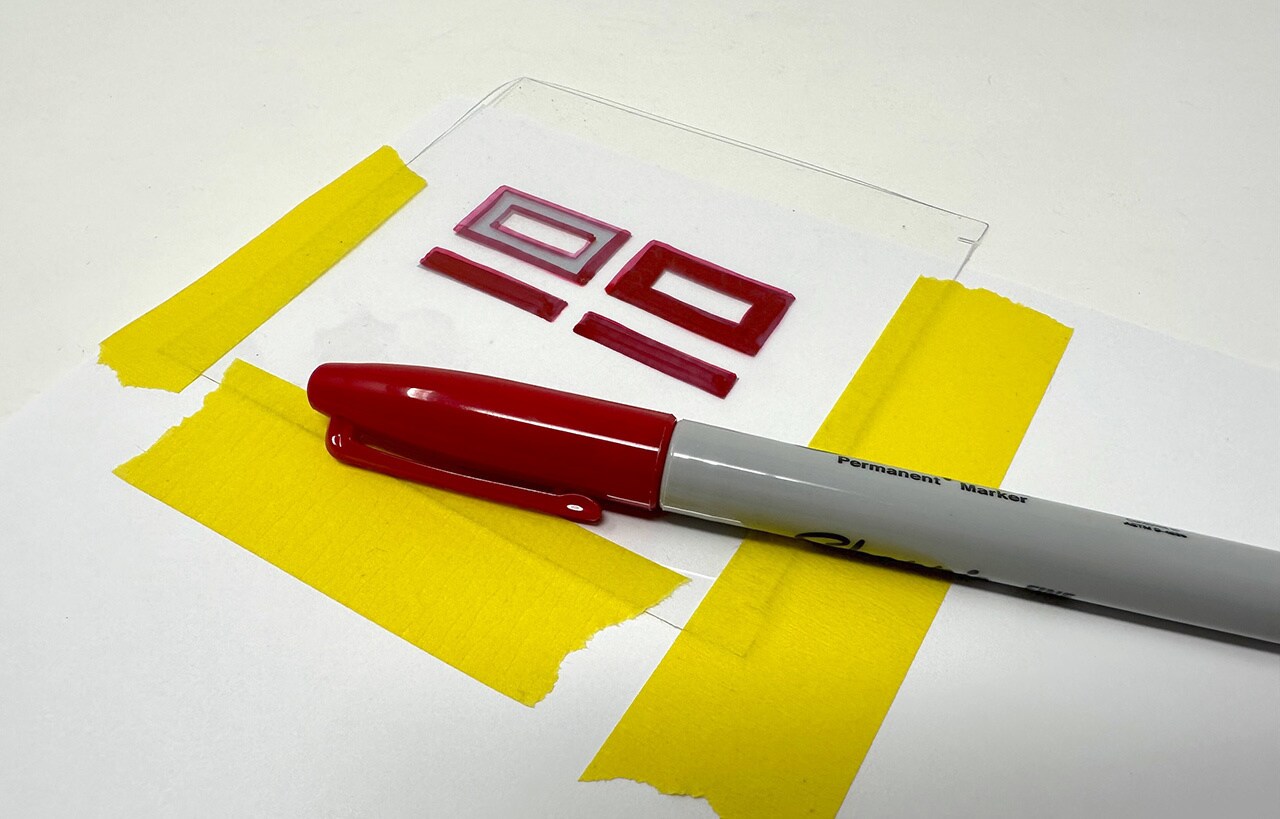
Step 4: Trace the symbol with red permanent marker. Let the ink dry and remove the masking tape.

Tip: You can use any matching color marker and glitter you’d like for the symbol!

Use red glitter glue or school glue to cover the symbol you traced. Use a small paintbrush for the edges and corners. If you used school glue, cover the glue with red glitter and shake off the glitter. Let the glue dry.

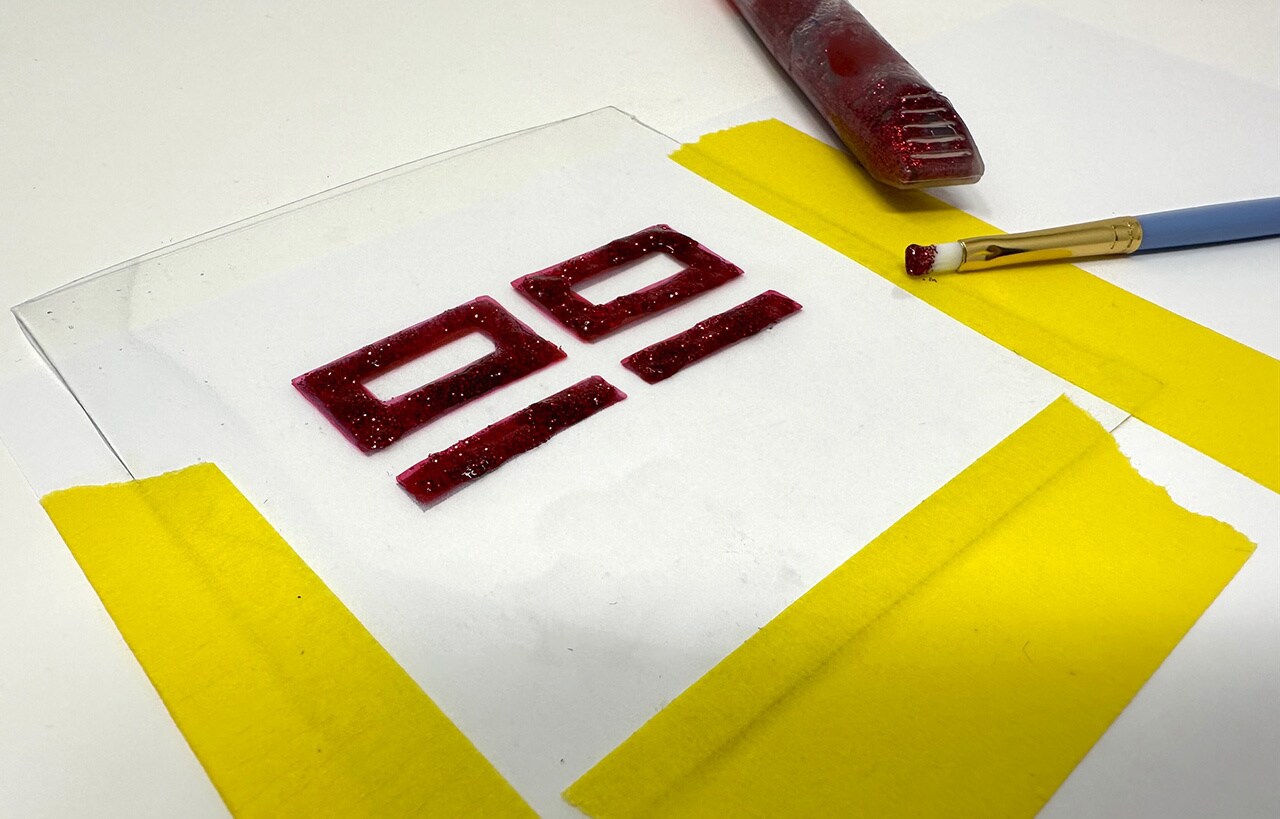
Step 5: Use red glitter glue or school glue to cover the symbol you traced. Use a small paintbrush for the edges and corners. If you used school glue, cover the glue with red glitter and shake off the glitter. Let the glue dry.

Next, cut four strips of the food packaging cardboard 4 inches long and 0.75 inches in width. Cut four more strips, 2.5 inches long and 0.75 inches in width.

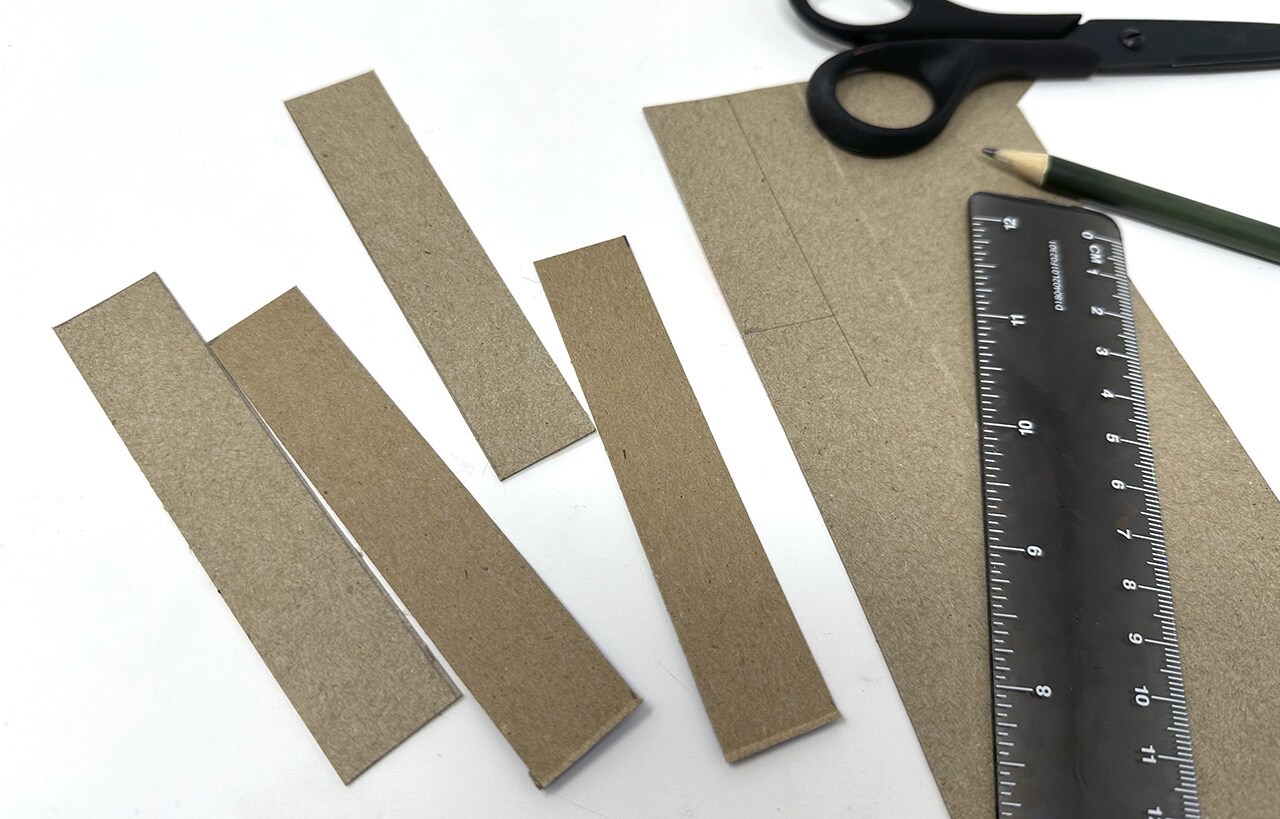
Step 6: Next, cut four strips of the food packaging cardboard 4 inches long and 0.75 inches in width. Cut four more strips, 2.5 inches long and 0.75 inches in width.

Step 7: With hot glue or school glue, glue the two longer strips of cardboard on the sides of the plastic packaging. Glue the two shorter strips between them. Let the glue cool or dry.

Step 8: Flip the ornament to the back side.

Step 9: Cut a small piece of the fishing line or string. Fold it into a loop, and glue it to the top edge of the plastic square.

Glue the four strips of cardboard to the back side of the ornament like you did the front. The top strip should cover the ends of the string you glued in the previous step. Let the glue dry or cool.

Step 10: Glue the four strips of cardboard to the back side of the ornament like you did the front. The top strip should cover the ends of the string you glued in the previous step. Let the glue dry or cool.

Tip: If you’re using school glue, you can use a clothespin to hold the top strip over the string as the glue dries.

Step 11: Flip the ornament to the front side.

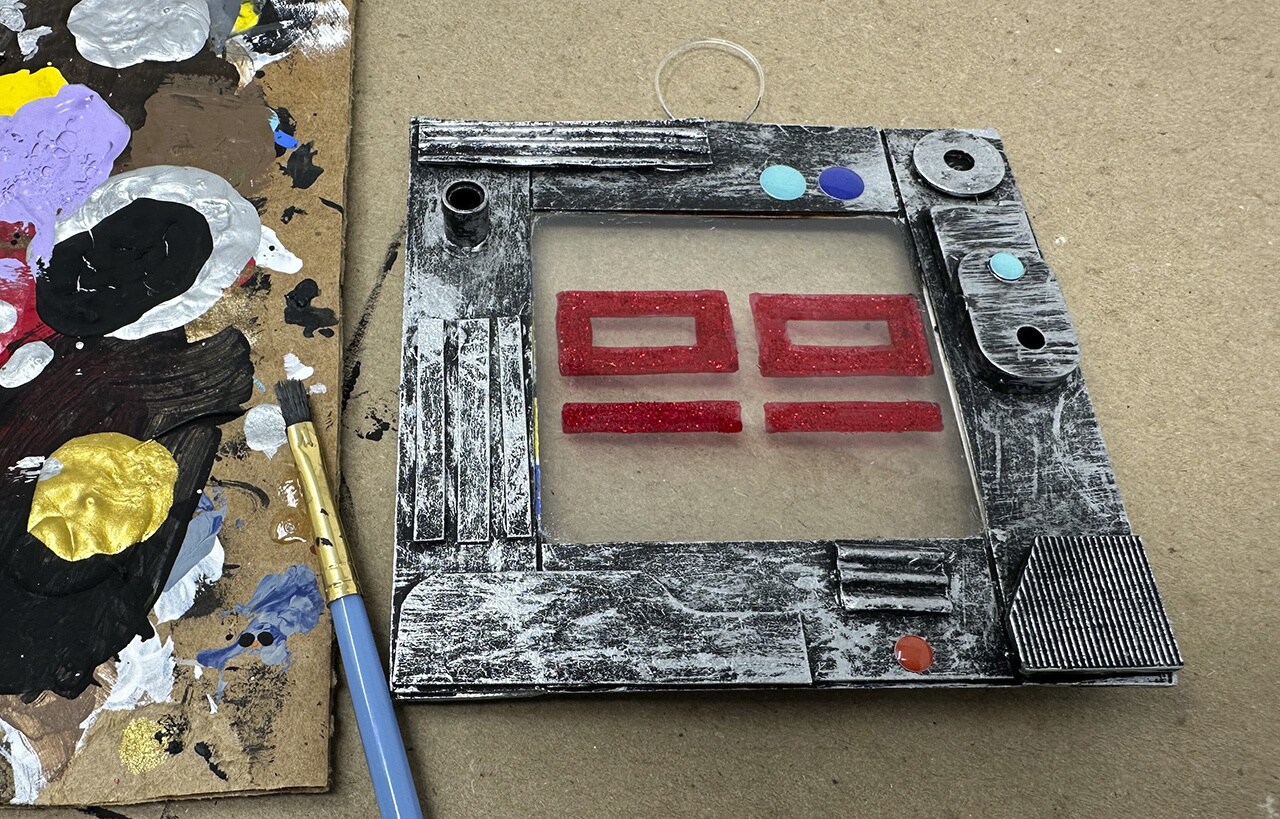
Step 12: Find small bits from the recycling and the junk drawer to make the small greeblies for the datapad. Leftover hardware pieces from building furniture, extra LEGO pieces included in kits, various plastic packaging and different shapes cut from cardboard packaging can add details to the datapad.

Glue small bits to the cardboard, using as many pieces as you’d like to finish the look.

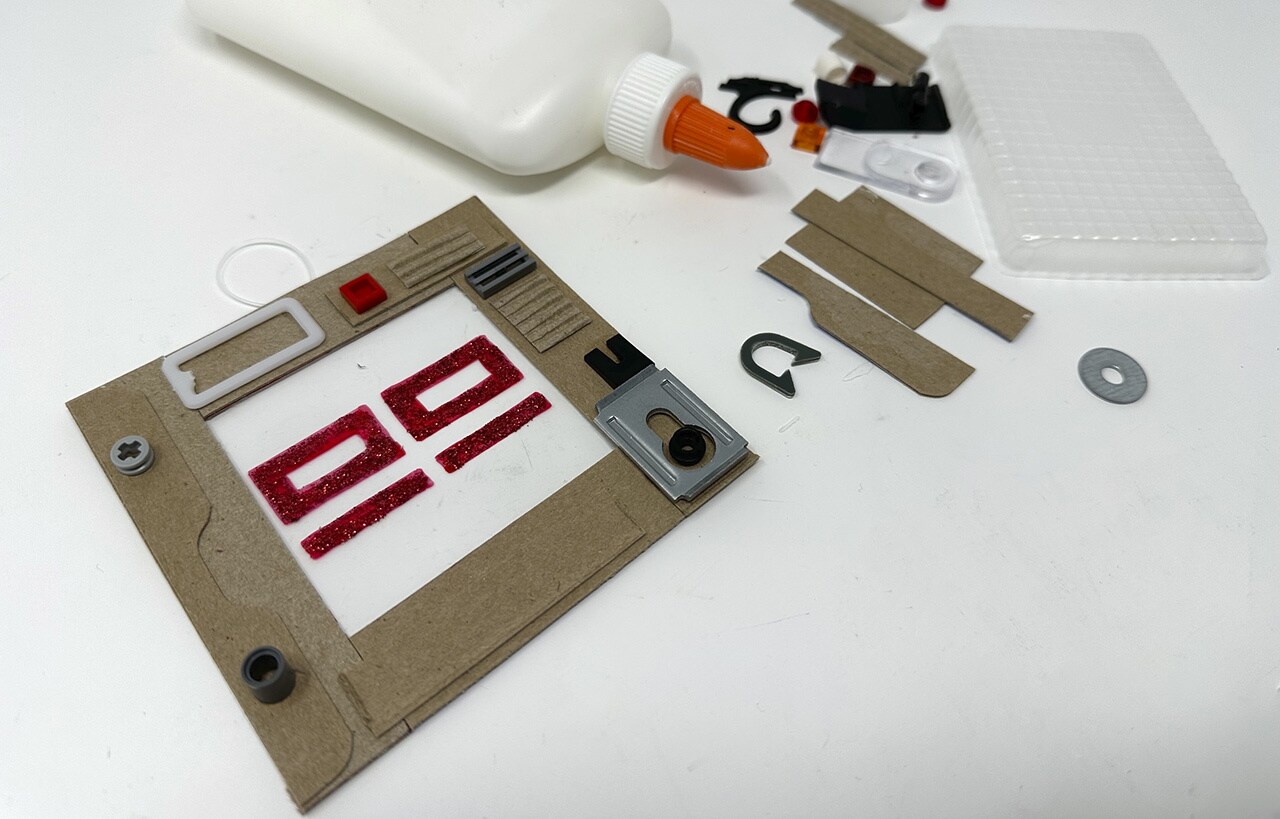
Step 13: Glue small bits to the cardboard, using as many pieces as you’d like to finish the look.

Paint the ornament black

Step 14: Next, paint the greeblies and the cardboard with black acrylic paint. Let the paint dry.

Tip: If you used metal pieces, paint them black and then gently wipe away the wet paint to give the metal a weathered look.

Step 15: Use a dry paint brush and dip it in the silver acrylic paint. Remove most of the paint from the brush by swiping it back and forth on a palette or scrap piece of paper.

Lightly dry brush the silver paint across the edges and greeblies on the datapad, making sure to leave some of the black paint visible.

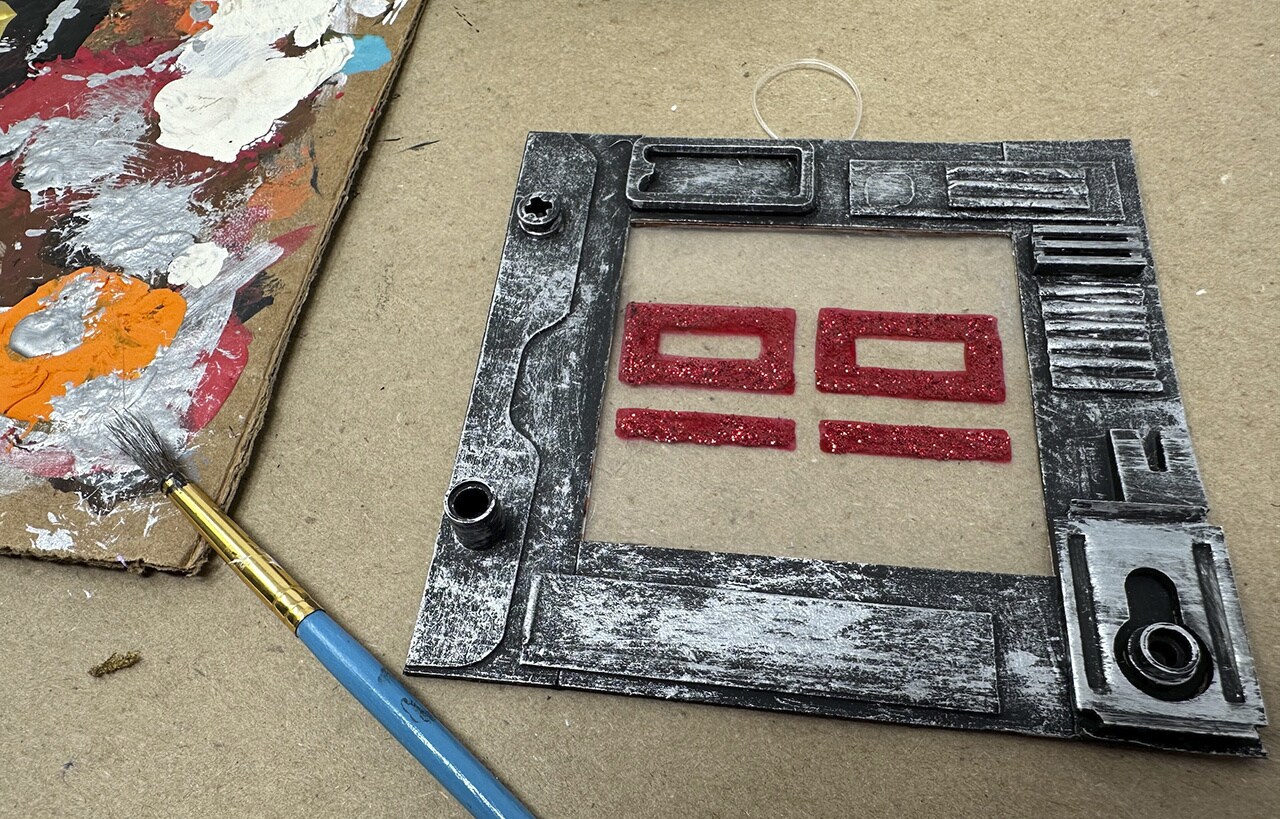
Step 16: Lightly dry brush the silver paint across the edges and greeblies on the datapad, making sure to leave some of the black paint visible.

Tip: If you get any paint on the clear center of the datapad, dip a cotton swab in water and gently wipe the paint away.

Once the paint is dry, add round enamel dot stickers as “buttons” on the datapad.

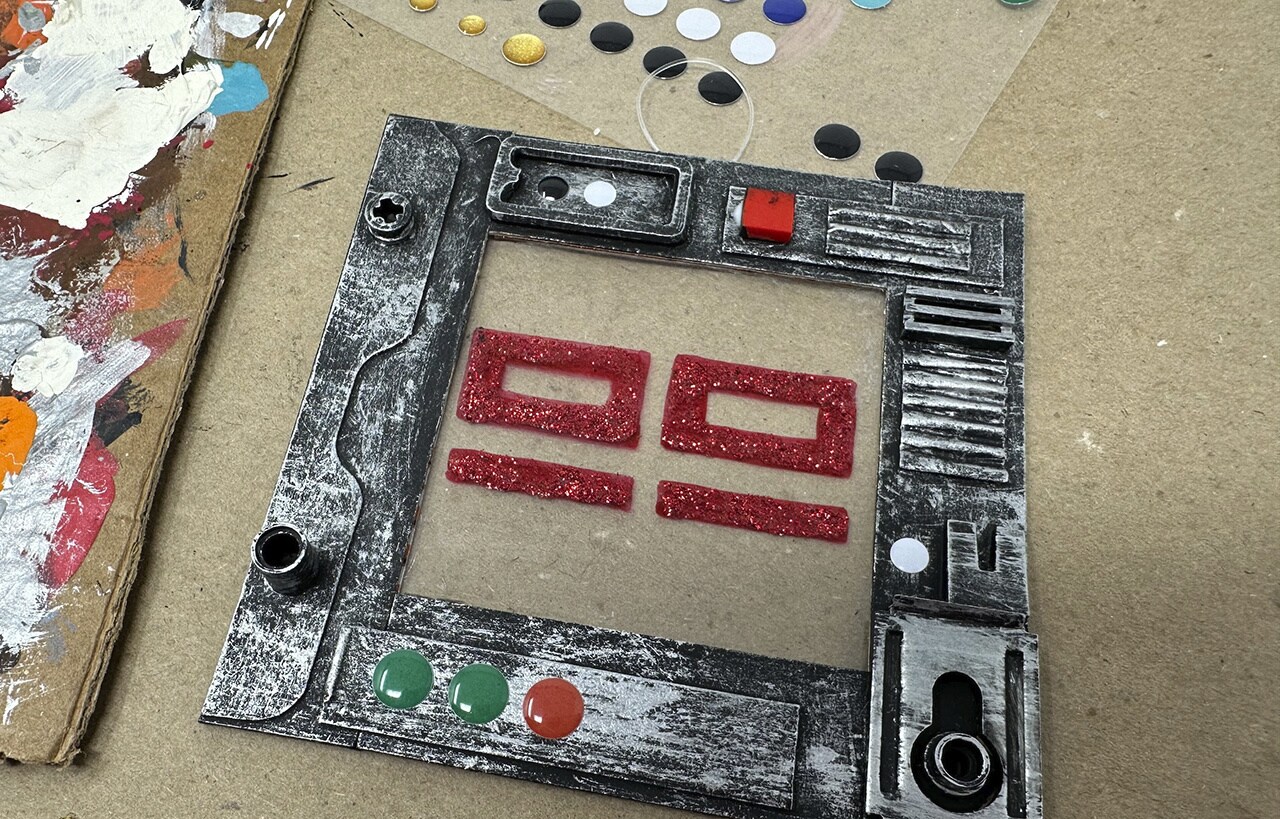
Step 17: Once the paint is dry, add round enamel dot stickers as “buttons” on the datapad.

Flip the ornament to the back side. Repeat steps 13-17 on that side to complete the datapad.

Step 18: Flip the ornament to the back side. Repeat steps 13-17 on that side to complete the datapad.

A complete datapad ornament hanging on a tree.

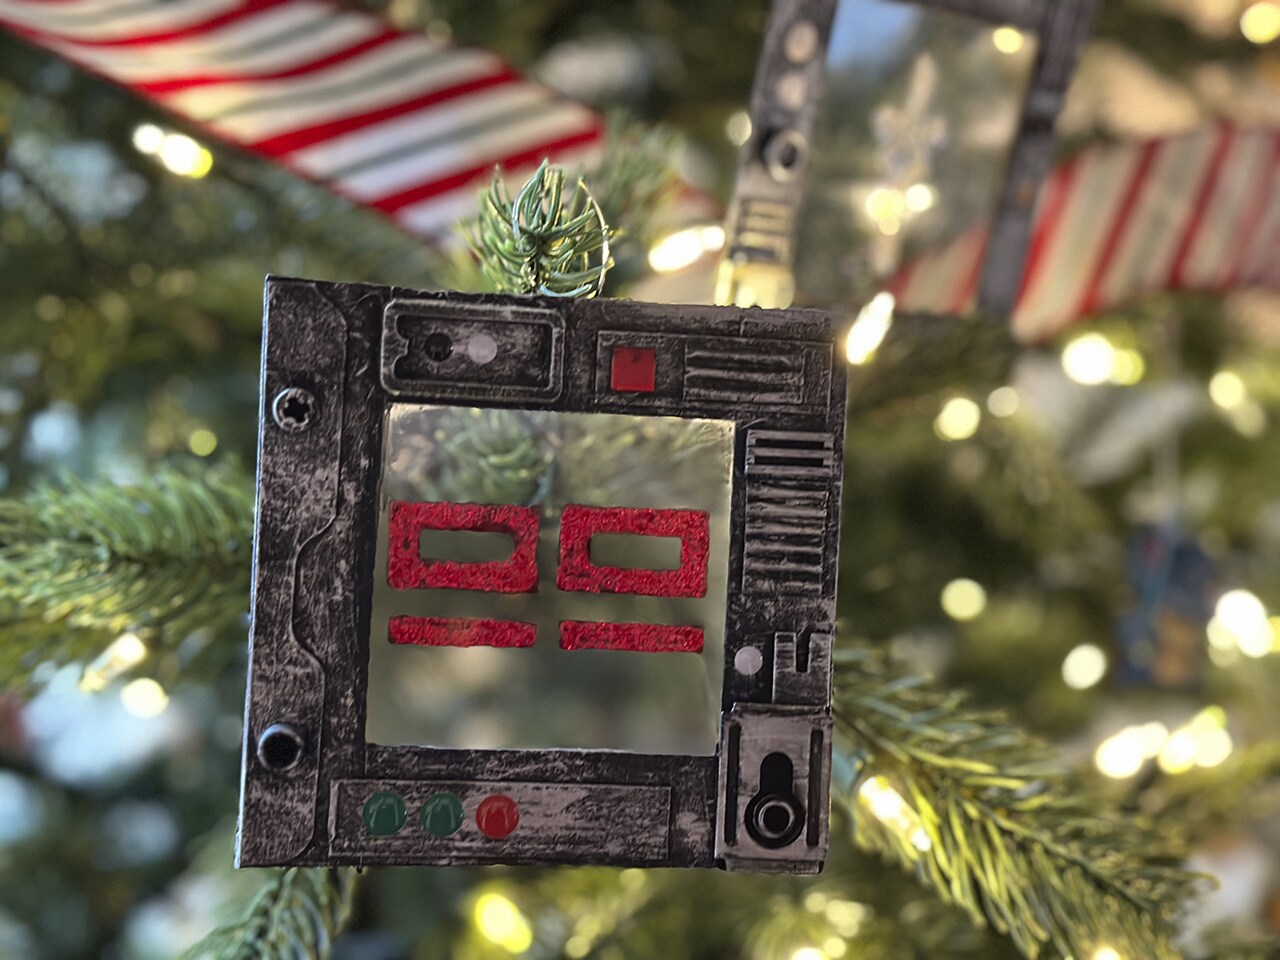
Your datapad ornament is complete! Use it as a holiday decoration or hang it in your room for a little Star Wars decorative touch all year around.

  • These aren't the droids you're looking for - Disney+

Kelly Knox is the author of Star Wars Conversation Cards, Be More Obi-Wan, and a co-author of Star Wars Everyday. Her next books, Star Wars: Dad Jokes and Return of the Jedi: A Visual Archive, are coming in Spring 2024. You can still find her on Twitter at @kelly_knox. 

Related Topics

Related Stories

  • Get your Own Droid Counterpart with the Special Edition Star Wars Cargo-Carrying Robot from Piaggio Fast Forward - Exclusive
    [object Object] [object Object]

    Get your Own Droid Counterpart with the Special Edition Star Wars Cargo-Carrying Robot from Piaggio Fast Forward - Exclusive

    May 2, 2025

    May 2, 2025

    May 2

  • Fight the Empire with an Andor-Inspired AT-ST Puppet
    [object Object] [object Object]

    Fight the Empire with an Andor-Inspired AT-ST Puppet

    April 24, 2025

    April 24, 2025

    Apr 24

  • Recharge your Andor Rewatch with this B2EMO Popcorn Box
    [object Object] [object Object]

    Recharge your Andor Rewatch with this B2EMO Popcorn Box

    March 11, 2025

    March 11, 2025

    Mar 11

  • Make Like Omega and Craft Your Very Own Straw Tooka Doll
    [object Object] [object Object]

    Make Like Omega with Your Very Own Straw Tooka Doll

    February 23, 2024

    February 23, 2024

    Feb 23

  • Everyone Needs a Wookiee Hug on Valentine’s Day
    [object Object]

    Everyone Needs a Wookiee Hug on Valentine’s Day

    February 8, 2024

    February 8, 2024

    Feb 8

  • Wrap Like a Wookiee for Life Day
    [object Object] [object Object]

    Wrap Like a Wookiee for Life Day

    November 17, 2023

    November 17, 2023

    Nov 17

  • Decorate Your Doorstep with a Nubs-o’-lantern
    [object Object] [object Object]

    Decorate Your Doorstep with a Nubs-o’-lantern

    October 25, 2023

    October 25, 2023

    Oct 25

  • You'll Love This DIY Loth-cat Pumpkin Meow and Forever
    [object Object]

    You'll Love This DIY Loth-cat Pumpkin Meow and Forever

    October 19, 2023

    October 19, 2023

    Oct 19

More From Star Wars:
  • TikTok
  • Instagram
  • Twitter
  • Facebook
  • Youtube
  • SWKids
  • Terms of Use
  • Additional Content Information
  • Privacy Policy
  • Children's Online Privacy Policy
  • Your US State Privacy Rights
  • Disney Store | Star Wars
  • Star Wars Helpdesk
  • Interest-Based Ads
  • Do Not Sell or Share My Personal Information

TM & © Lucasfilm Ltd. All Rights Reserved